Порой необходимо создавать элементы динамически, или же размер элементов может сильно варьироваться. Как же тогда организовать перенос элементов на другую строку? Ни LinearLayout, ни RelativeLayout этого не позволяют.
Для начала создадим атрибут для нашего элемента, чтобы можно было в .xml задать отступы между элементами.
 <declare-styleable name="FlowLayout">
        <attr name="paddingV" format="string" />
        <attr name="paddingH" format="string" />
    </declare-styleable>
Сам класс же вот:
public class FlowLayout extends ViewGroup {
	// padding bettwen elements
    private int PAD_H, PAD_V;
    private int mHeight;

    public FlowLayout(Context context) {
        super(context);
        setPaddings(0,0);
    }

    protected void setPaddings(int V, int H){
    	 PAD_H = H;
         PAD_V = V;
    }

    protected void setPaddings(Context ctx, AttributeSet attrs){
		TypedArray a = ctx
				.obtainStyledAttributes(attrs, R.styleable.FlowLayout);
		String H = a.getString(R.styleable.FlowLayout_paddingH);
		String V = a.getString(R.styleable.FlowLayout_paddingV);
		// LOG.d("H = " + H + "V=" + V);
		if (H == null || V == null)
			setPaddings(V == null ? 0 : Integer.parseInt(V), H == null ? 0 :Integer.parseInt(H));
		else {
			setPaddings(Integer.parseInt(V), Integer.parseInt(H));
			a.recycle();
		}

    }

    public FlowLayout(Context context, AttributeSet attrs) {
        super(context, attrs);
        setPaddings(context,attrs);
    }

    public FlowLayout(Context context, AttributeSet attrs, int defStyle) {
    	super(context, attrs, defStyle);
        setPaddings(context,attrs);
    }
    @Override
    protected void onMeasure(int widthMeasureSpec, int heightMeasureSpec) {
        assert (MeasureSpec.getMode(widthMeasureSpec) != MeasureSpec.UNSPECIFIED);
        final int width = MeasureSpec.getSize(widthMeasureSpec) - getPaddingLeft() - getPaddingRight();
        int height = MeasureSpec.getSize(heightMeasureSpec) - getPaddingTop() - getPaddingBottom();
        final int count = getChildCount();
        int xpos = getPaddingLeft();
        int ypos = getPaddingTop();
        int childHeightMeasureSpec;
        if(MeasureSpec.getMode(heightMeasureSpec) == MeasureSpec.AT_MOST)
            childHeightMeasureSpec = MeasureSpec.makeMeasureSpec(height, MeasureSpec.AT_MOST);
        else
            childHeightMeasureSpec = MeasureSpec.makeMeasureSpec(0, MeasureSpec.UNSPECIFIED);
        mHeight = 0;
        for(int i = 0; i < count; i++) {
            final View child = getChildAt(i);
            if(child.getVisibility() != GONE) {
                child.measure(MeasureSpec.makeMeasureSpec(width, MeasureSpec.AT_MOST), childHeightMeasureSpec);
                final int childw = child.getMeasuredWidth();
                mHeight = Math.max(mHeight, child.getMeasuredHeight() + PAD_V);
                if(xpos + childw > width) {
                    xpos = getPaddingLeft();
                    ypos += mHeight;
                }
                xpos += childw + PAD_H;
            }
        }
        if(MeasureSpec.getMode(heightMeasureSpec) == MeasureSpec.UNSPECIFIED) {
            height = ypos + mHeight;
        } else if(MeasureSpec.getMode(heightMeasureSpec) == MeasureSpec.AT_MOST) {
            if(ypos + mHeight < height) {
                height = ypos + mHeight;
            }
        }
        height += 5; // Fudge to avoid clipping bottom of last row.
        setMeasuredDimension(width, height);
    }

    @Override
    protected void onLayout(boolean changed, int l, int t, int r, int b) {
        final int width = r - l;
        int xpos = getPaddingLeft();
        int ypos = getPaddingTop();
        for(int i = 0; i < getChildCount(); i++) {
            final View child = getChildAt(i);
            if(child.getVisibility() != GONE) {
                final int childw = child.getMeasuredWidth();
                final int childh = child.getMeasuredHeight();
                if(xpos + childw > width) {
                    xpos = getPaddingLeft();
                    ypos += mHeight;
                }
                child.layout(xpos, ypos, xpos + childw, ypos + childh);
                xpos += childw + PAD_H;
            }
        }
    }

}
Использование класса в .xml будет таким:
  <RelativeLayout xmlns:android="http://schemas.android.com/apk/res/android"
    xmlns:t="http://schemas.android.com/apk/res/ru.suvitruf.flowlayoutexample"
    xmlns:tools="http://schemas.android.com/tools"
    android:layout_width="match_parent"
    android:layout_height="match_parent"
    android:paddingBottom="@dimen/activity_vertical_margin"
    android:paddingLeft="@dimen/activity_horizontal_margin"
    android:paddingRight="@dimen/activity_horizontal_margin"
    android:paddingTop="@dimen/activity_vertical_margin"
    tools:context=".MainActivity" >

    <ru.suvitruf.flowlayoutexample.view.FlowLayout
        android:id="@+id/test_flow_layout"
        android:layout_width="wrap_content"
        android:layout_height="wrap_content"
        t:paddingH="@integer/test_padding_h"
        t:paddingV="@integer/test_padding_v" >
    </ru.suvitruf.flowlayoutexample.view.FlowLayout>

</RelativeLayout>
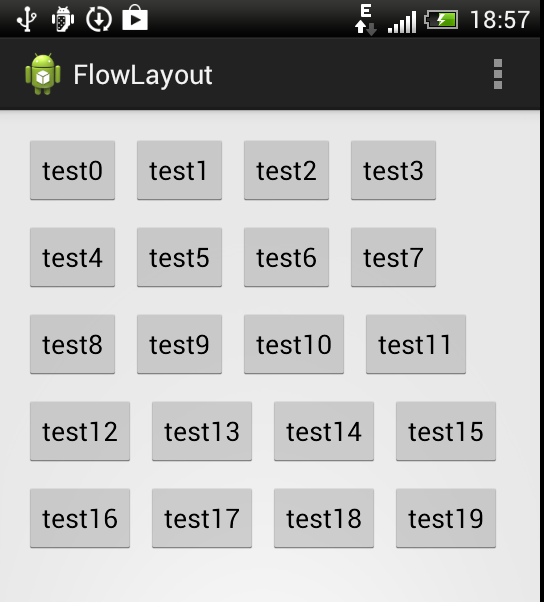
Можно добавлять элементы прям внутрь нашего элемента. Или же добавлять динамически, скажем так:
FlowLayout l = (FlowLayout) findViewById(R.id.test_flow_layout);

		for (int i = 0; i < TEST_ELEMENTS_COUNT; ++i) {
			Button btn = new Button(this);
			btn.setText(getResources().getString(R.string.test_string)
					+ Integer.toString(i));
			l.addView(btn);
		}
Тогда, увидите то же, что и на пикче сверху. Единственная проблема — добавление пустых контейнеров. Скажем, если вы добавите внутрь FlowLayout, к примеру, LinearLayout без всяких элементов (даже с явно заданными размерами), то не отобразится этот LinearLayout. Качнуть можно с гитхаба.
Спасибо, использовал Вашу разработку.
Скопировал весь код,но студия не хочет распознавать эту строку:
xmlns:t=»http://schemas.android.com/apk/res/ru.suvitruf.flowlayoutexample»
После удаления строки ошибка при запуске + не отображается компонент.Подскажите пожалуйста как исправить
А класс у вас в каком пакете находится?